DocsBlender manualUser InterfaceNodes
Node Editors
From the Blender 5.2 LTS Manual by the Blender Documentation Team, adapted for Angelo · CC BY-SA 4.0
Header
The Header contains various menus, buttons and options, partially based on the current node tree type.

Common node editor header options.
- View
This menu changes your view of the editor.
- Select
This menu allows you to select a node or groups of nodes.
- Add
This menu allows you to add nodes.
- Node
This menu allows you to do things with selected nodes.
- Pinned
When enabled, the editor always displays the currently selected node tree, regardless of changes in the active object or scene. This allows you to edit a material, texture, or compositor node tree independently of what is selected in the 3D Viewport or which scene is active. Useful when working across multiple objects or scenes but wanting to keep the editor focused on one specific node tree.
- Parent Node Tree
Leaves the current node group and returns to the parent node group/tree.
- Snapping
Change options for snapping node positions to achieve a cleaner node tree layout. See Arranging Nodes.
Overlays
Overlays are information that is displayed on top of the nodes and node trees. There is a toggle to show or hide all overlays for the node editor next to the overlay popover.
- Wire Colors
Color node links based on their connected sockets.
- Reroute Auto Labels
Label Reroute Nodes based on the label of connected reroute nodes.
- Context Path
Display breadcrumbs in the upper left corner indicating the hierarchy location of the node tree/group that’s currently being displayed.
- Annotations
Displays Annotations in the preview region.
- Previews
Display each node’s Preview if the node’s preview is also toggled.
- Timings
Display each node’s last execution time. This option is only available for compositing and geometry nodes.
In the context of geometry nodes, see Node Timings Overlay.
- Render Region
Displays a border showing the final render region defined in the scene. Space outside the render region appear shaded for reference.
- Passepartout Alpha
Controls the opacity of the shaded area outside the render region. Higher values darken the outside area more, making the render region stand out.
Toolbar
The Toolbar contains a set of tools that can be used in the node editor.
- Select
Select or move nodes and links.
- Select Box
Select nodes or links by dragging a box around them.
- Select Circle
Select nodes or links by clicking or dragging with a circular brush.
- Select Lasso
Select nodes or links by drawing a free-form lasso.
- Annotate
Draw free-hand annotation.
- Annotate Line
Draw straight line annotation.
- Annotate Polygon
Draw a polygon annotation.
- Annotate Eraser
Erase previous drawn annotations.
- Link Cuts
Delete connections between nodes by drawing a line across the links. See Cut Links for more information.
- Mute Links
Mute connections between nodes by drawing a line across the links. Muted links are kept in place but ignored in evaluation. See Mute Links for more information.
- Add Reroute
Insert a Reroute Node point on links by drawing a line across them. Reroute nodes help organize complex node trees by redirecting connections.
Sidebar
The Sidebar region contains properties for the currently selected node as well as node editor-specific settings.
Node
Reference
- Panel:
The Node tab in the Sidebar contains properties that control the behavior and appearance of the active node. Available options depend on the node type and the editor.
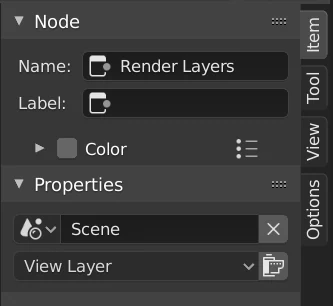
Node tab with a compositing Render Layers node selected.
Node
- Name
A unique identifier for the node within its node tree. This name must be unique and is used internally for references.
- Label
A custom title displayed at the top of the node. Unlike the Name, this does not need to be unique and is useful for organizing complex node trees.
- Color
By default, the node background color is defined by the current theme. Enable this option to override it with a custom color.
Custom colors can provide visual cues to distinguish related nodes or highlight important parts of a node tree.
The preset button next to the color field allows saving and reusing custom colors.
- Show Options
Shows or hides additional node-specific options in the node header, when available for that node type.
- Mute
Temporarily disables the node without removing it. When possible, the node is bypassed and its inputs are passed directly to its outputs.
- Propagation Geometry Nodes
Controls which messages from this node are propagated to the parent node group or modifier.
- All Messages:
Propagate informational messages, warnings, and errors.
- Errors and Warnings:
Propagate only warnings and errors.
- Errors:
Propagate only error messages.
- None:
Do not propagate any messages.
Properties
The properties that are shown depend on the type of node selected, e.g. a Mix node has different properties than a Mask node.
Custom Properties
Create and manage your own properties to store data in the active node. See the Custom Properties page for more information.
Tool
Reference
- Panel:
Active Tool
The info in this panel changes with the selected tool.
View
Reference
- Panel:
Annotations
You can select the Annotate tool in the Toolbar to make annotations in the node editor. See Annotate Tool for more info.
Adding Nodes
Reference
- Menu:
- Shortcut:
Shift-A
Nodes are added via the Add menu in the editor’s header or using a keyboard shortcut.
Nodes can also be added by dragging a connection from an existing node’s input or output socket and dropping the connection above an empty space instead of connecting to another socket. This action will open a search menu with a list of compatible nodes and their sockets that can be added and connected to the existing node. Confirming the menu selection will add the node which can then be moved and placed.