DocsTension maps
See where a mesh stretches
New in 1.0.8 When a character bends, cloth falls or you sculpt, parts of the surface stretch and others squash. A tension map colors them in the 3D view, blue where the surface got shorter and red where it got longer, live while you pose or play.
Show a tension map, step by step#
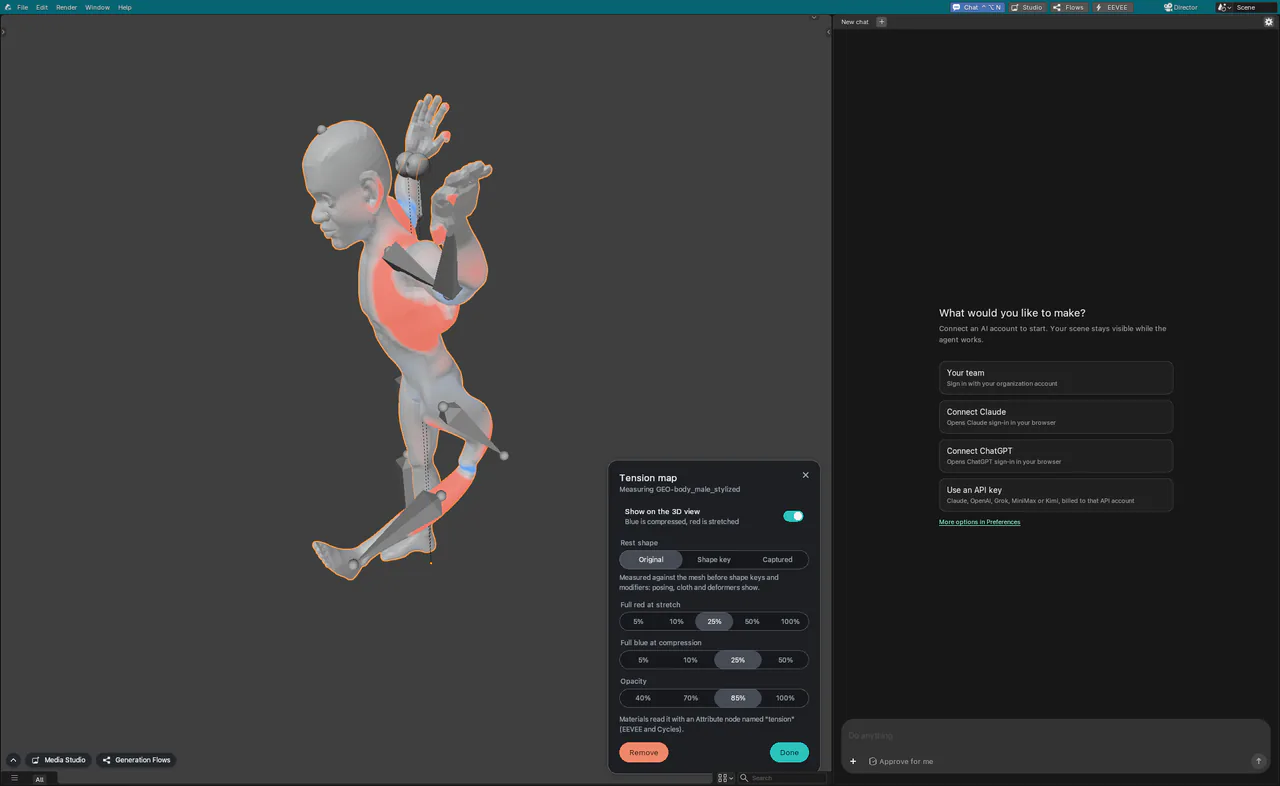
- Select the mesh you want to check. Several selected meshes are measured together.
- In the chat bar, click + and, under Inspect, choose Tension map.
- Angelo adds a Tension modifier to each selected mesh (one Undo step), turns the map on in this window's 3D views and opens the Tension map card in the corner.
- Pose, play the animation or edit. Blue is compressed, red is stretched; the colors follow every change.
- Click Done to close the card and keep the map, or Remove to turn the modifiers off and hide the map, as one Undo step.
The card#
The card stays open while you orbit, pose and play. Every change shows at once.
| Setting | What it does |
|---|---|
| Show on the 3D view | Turns the map on or off in this window's 3D views. |
| Rest shape | What the mesh is measured against: Original, Shape key or Captured (below). |
| Full red at stretch | How much stretch shows as full red, from 5% to 100%. |
| Full blue at compression | How much compression shows as full blue, from 5% to 50%. |
| Opacity | How strongly the colors cover the surface. |
Surface that isn't strained keeps a light veil, so you can tell the map is on. The range and opacity belong to the 3D view, like Blender's own overlays.
Rest shapes#
Stretch is always measured against a rest shape, the mesh as it was before it moved:
- Original (the default): the mesh before shape keys and modifiers, so posing with an armature, cloth and other deformers shows.
- Shape key: a shape key you pick (a stored version of the mesh's shape). Animate the other keys to see them stretch.
- Captured: click Capture rest shape to store the mesh's shape now, then sculpt or edit and compare.
Each change of rest shape is one Undo step.
The Tension modifier#
A modifier is a step that changes or measures a mesh without touching its original data. You can also add this one yourself: Add Modifier ▸ Edit ▸ Tension. It changes no geometry; it only measures.
- It goes right after the last modifier that deforms the mesh (Armature, Cloth, Lattice and the like), so it measures that motion, and a Subdivision Surface after it smooths the result instead of being measured. This applies however the modifier is added.
- If a modifier that changes the number of vertices comes before it, such as Mirror or Array, Angelo turns on the object's rest position so the Original rest shape can still be measured.
- Smooth averages each vertex's value with its neighbors that many times (0 by default).
On a million-vertex mesh it shows stretch and compression about 8× faster than the Geometry Nodes workaround. A mesh without the modifier, or a 3D view with the map off, costs nothing.
Use it in a material#
The modifier writes each vertex's value as an attribute named tension: 0.1 means 10% stretched, -0.1 means 10% compressed. In EEVEE and Cycles a material reads it with an Attribute node of that name. The card shows the name your materials should use.
It also writes each edge's value as tension_edge. You can rename either output on the modifier, or clear the edge one to skip it.
You can also ask the agent to add and set up the Tension modifier. Showing the map is a setting of your 3D view, which you turn on from the + menu or the card.
Limits#
- In Edit Mode the map is measured only when the modifier is shown in Edit Mode.
- In Sculpt Mode the map shows only when the sculpt view draws the evaluated mesh (with its modifiers).
- Turning the map off is a view setting, so after Remove, Undo brings the modifiers back but leaves the map hidden, as with Blender's own overlays.
- Blender doesn't know the Tension modifier: opening an Angelo file in Blender drops it.