DocsUV checker
Check your UVs in the viewport
New in 1.0.8 A UV map says how a flat texture wraps around a model. To check one in Blender, you make a checker image and wire it into every material, then undo it all. Angelo draws the checker straight in the 3D view, over every mesh, and changes no material at all.
Check an unwrap, step by step#
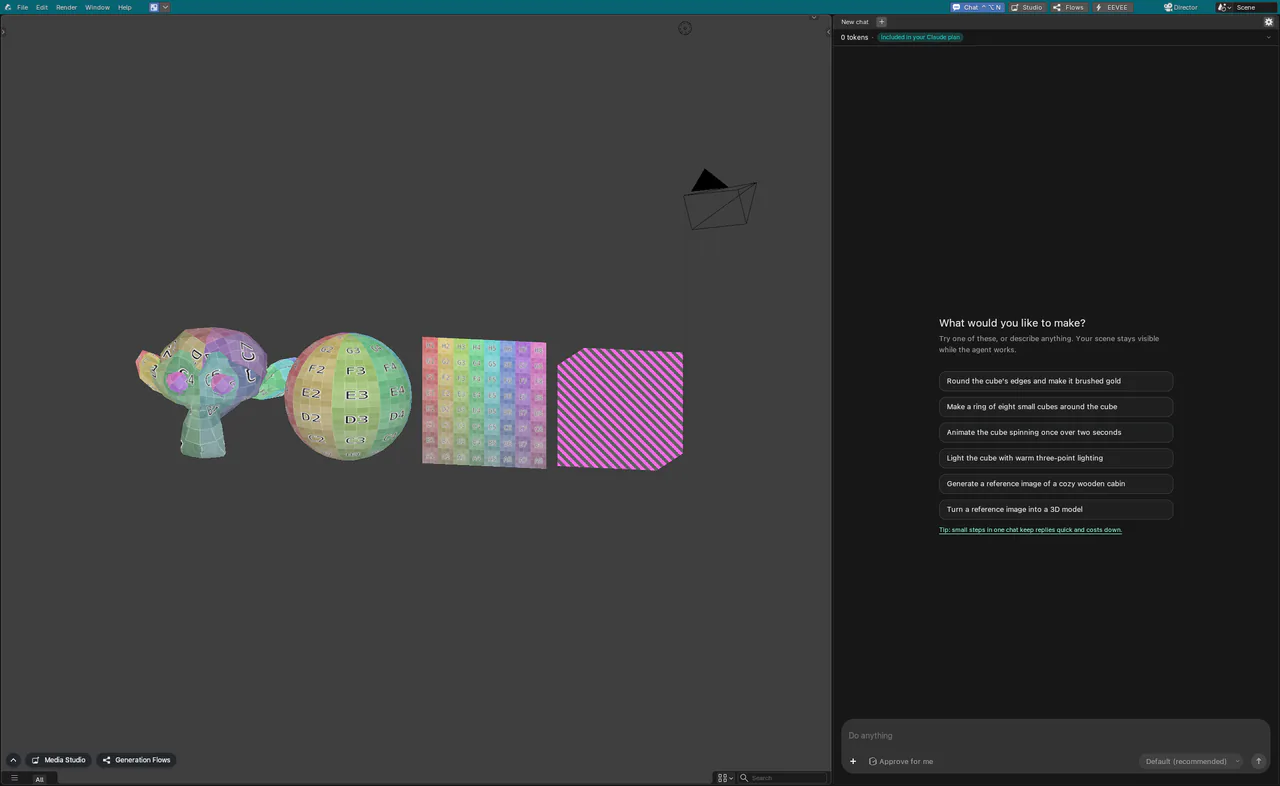
- In the chat bar, click + and, under Check, choose UV checker. The checker appears on every visible mesh and the UV checker card opens in the corner.
- Pick a Pattern. Start with Grid to see where each part of the texture lands, then try Stretch or Density.
- Turn on Mark flipped UVs to hatch faces whose UVs are mirrored.
- Keep working: orbit, edit and unwrap with the card open. In Edit Mode, a UV change shows on the model right away.
- Turn it off with Show UV checker on the card, or the same button you used to turn it on.
The patterns#
| Pattern | What it shows |
|---|---|
| Grid | Lettered, colored cells show where each part of the texture lands and which way it faces. The default. |
| Checker | Even black and white squares show stretching and scale at a glance. |
| Density | Texel density: how many texture pixels each meter of surface gets, against your target. Blue is a quarter or less, green on target, red four times or more; each color step is twice or half as many. |
| Stretch | How far each face's UVs are from its 3D shape. Blue is none; red is a lot. |
For Grid and Checker, Repeats per UV tile (1× to 16×) sets how many times the pattern repeats. For Density, set the Texture size you will paint at (512 to 8K) and your Target texels per meter (128 to 2048). UVs squashed to nothing read as blue in Density and as the most stretched in Stretch.
With UDIM tiles (UVs spread over several numbered image tiles), the pattern repeats in every tile at the same density, so nothing outside the first tile is lost.
Which meshes and which UV map#
- Objects: All visible meshes, or only the Selected ones.
- UV map: Active (editing), the map you are editing; Render, the map used for rendering; or a map by name, chosen from the maps of the visible meshes.
- A mesh without that UV map, or with no UVs at all, is hatched magenta and dark grey, never left blank. The card says how many visible meshes lack it and names the first ones.
- With Mark flipped UVs on, faces whose UVs are mirrored are hatched pink. Mirrored UVs are often intentional, so check before you fix them.
Where to turn it on#
| Where | How |
|---|---|
| Chat bar | + ▸ UV checker, under Check. Turns it on and opens the card. |
| Director's top bar | The checker button after the menus (pressed while on), and the arrow beside it for the card. |
| Manual mode | The same two buttons in the 3D view's header, in Solid and Material Preview shading. |
| View menu | View ▸ Toggle UV Checker, or View ▸ UV Checker… for the card. |
| Search | Press F3 and type UV Checker. |
It has no key. Each 3D view has its own checker, and its settings are saved with the view in your file.
What it changes, and what it doesn't#
- Nothing in your scene or file changes: no material, image, node or texture is made, assigned or touched.
- It shows in Solid and Material Preview shading, not in Wireframe, Rendered or X-ray. It shows even with overlays turned off, and Face Orientation draws over it when both are on.
- Only meshes get it. An object in Sculpt Mode keeps its own shading.
- The first time you turn it on, the view may draw for a moment without it while it gets ready; your view never stalls. Turned off, it costs nothing.
- Blender ignores the setting when it opens an Angelo file.
The agent can look at a UV layout with its own checker view to judge an unwrap it made. It never turns your checker on or off, and your checker never colors the views the agent looks at.